

Bracelet Clasp Types: Safety, Box, Lobster, and Spring Rings
Learn which bracelet clasp types a photo can reliably show, which visual clues are misleading, and the safe next steps to confirm identity before you act.
Quick answer: what photos can show about bracelet clasp types
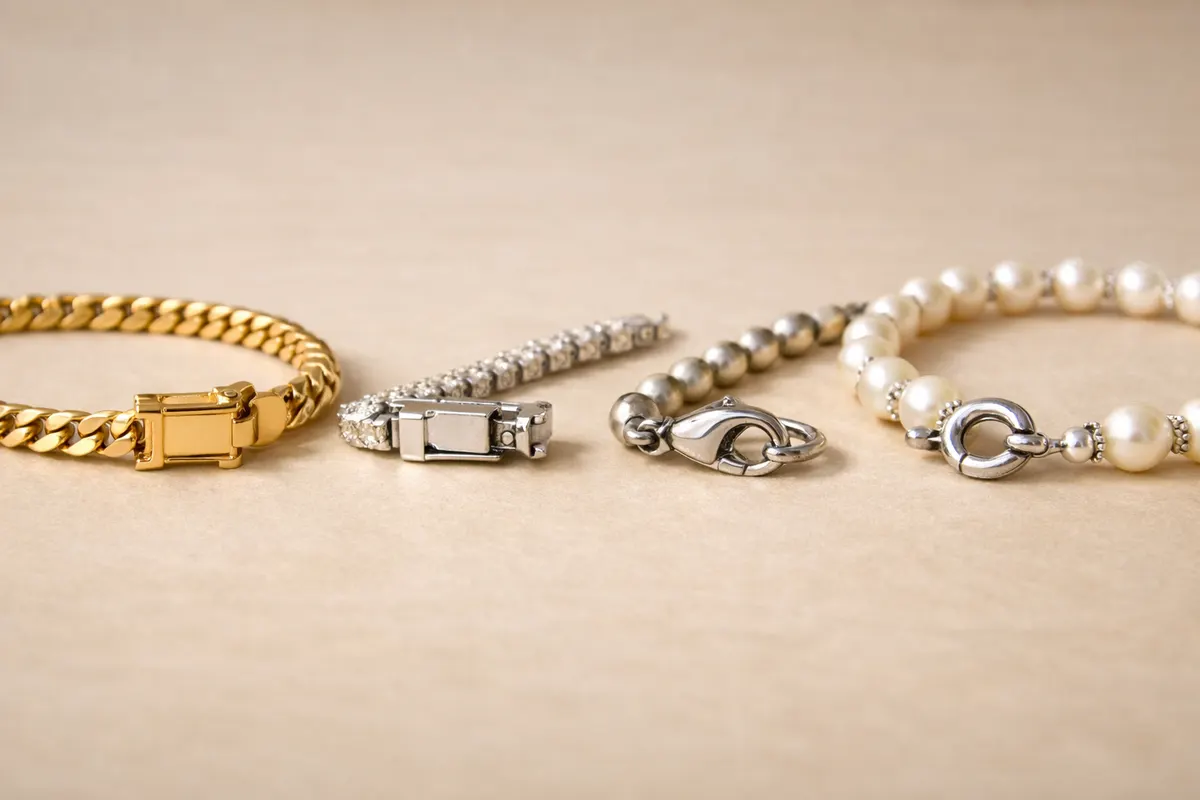
When you want to identify bracelet clasp types from a photo, the strongest visual evidence is the mechanism’s shape and moving parts: the silhouette of a box mouth, the claw and hinge of a lobster, or the small lever and circular body of a spring ring. Photos that show a clear, in-focus view of the clasp’s working edge — where two parts meet and lock — usually let you separate the major classes of clasps with reasonable confidence.
That said, a single photo rarely proves anything beyond the visible mechanism. Hallmarks, metal purity, maker marks, or internal springs cannot be reliably read in most casual images. Avoid treating a single image as definitive proof of metal type, age, or value. Instead use photos to narrow possibilities: a short list of likely clasp types and the specific next checks to pursue.
If you take just one thing away: use close, focused photos of the clasp from both sides and, if possible, with the clasp open and closed. Those angles preserve the most diagnostic clues for comparing box, lobster, spring-ring, and safety clasps, and they make safe next steps — like a jeweler inspection or an app-assisted search — much more useful.
Strongest visual clues
Prioritize clues that remain distinctive across lighting and small camera shake. The shape of the locking interface is the best starting point: box clasps typically show a rectangular “box” with a tongue that slides in; lobster clasps look like a hinged oval or teardrop with a visible hinge pin; spring rings are small circular discs with a lever segment. These silhouette features are robust — you can often recognize them even in phone photos taken from a modest distance.
Look for moving-part evidence: hinges, levers, and visible seam lines. A hinge pin or visible pivot axis is a strong signal for hinged designs such as lobster or fold-over safety clasps. A thin tongue that retracts into a hollow body points to a box-style clasp. If you can see a small notch or slot where a tongue locks, that notch is more diagnostic than the overall finish or color.
The relationship between the clasp and the chain end is another reliable clue. Notice how the chain terminates: a solid end link that inserts into a box, a jump ring attached to a spring ring, or a plate that receives a fold-over safety. The mating geometry — how parts meet — survives many photographic limitations and helps exclude lookalikes that share similar surface details but different mechanisms.
Finally, small construction details like the presence of a safety latch, a figure-eight guard, or an auxiliary securing catch are highly informative. Safety clasps almost always add a secondary guard or latch; if you can capture that extra piece in your photo it shifts the identification from an ordinary box or lobster clasp to a safety-equipped variant, which affects repair and wear concerns.
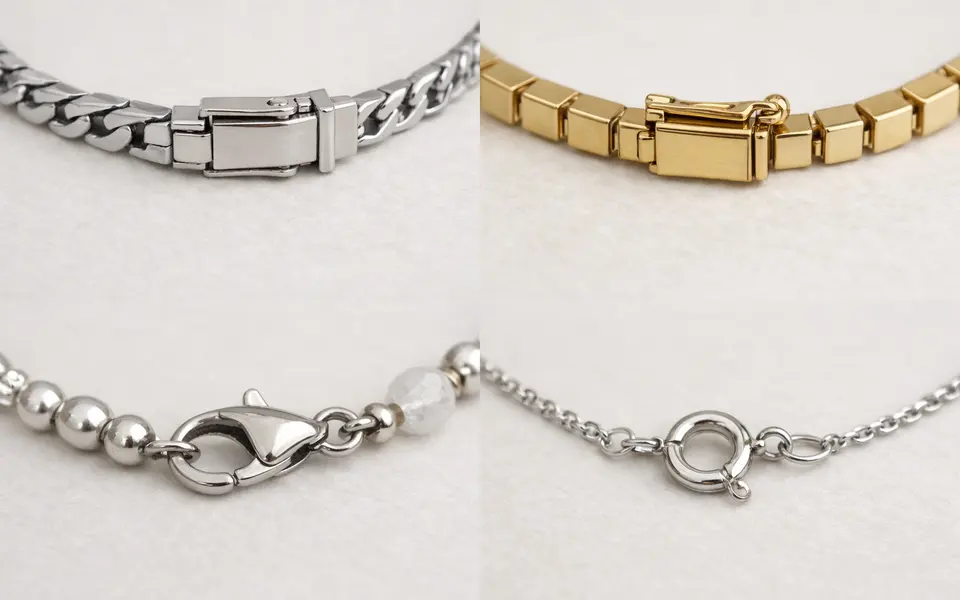
- Silhouette of the locking part (box, claw, ring) — most diagnostic.
- Visible hinge axis or pivot pin — indicates hinged/claw designs.
- Tongue and slot geometry — key for box-style clasps.
- Presence of a safety latch, fold-over plate, or figure-eight guard.
- How the chain end fits: end link, plate, or pin engagement.
- Notches or engagement teeth visible in the closed position.
- Relative size compared with chain links — helps separate small spring rings from larger lobster clasps.
- Marks of wear where moving parts meet — shows which surfaces interact and how they might be repaired.
Weak signals
Some visual cues are tempting but unreliable. Color and surface finish — whether the metal looks yellow or white in a photo — are easily distorted by lighting, camera auto-white balance, or reflections from nearby objects. Don’t use color alone to infer gold versus gold-plated, or silver versus white metals; that usually requires stamps, tests, or professional inspection.
Small hallmarks and tiny maker stamps are useful when legible, but blurred or partial marks are weak signals. Low-resolution images or compression artifacts commonly change the shape of stamped numbers and letters. If a hallmark looks like a familiar karat mark but is blurred, treat it as a lead for closer inspection rather than proof.
Contextual cues such as chain style, decorative flourishes, or brand-like design elements can mislead. Designers often reuse clasp styles across product lines and materials; a fashionable link pattern doesn’t guarantee a particular clasp mechanism or metal. Avoid letting style association overrule direct mechanical evidence from the clasp itself.
- Color/finish in photos — affected by light and camera processing.
- Blurry or partial hallmarks — can’t confirm purity or maker.
- Glare and reflections hiding seam lines or small levers.
- Single-angle shots that hide the mating geometry (open vs closed).
- Assuming chain style equals material or era.
- Decorative covers that conceal the actual locking mechanism.
- Small repairs or aftermarket add-ons that mimic original parts.
A step-by-step workflow for comparing likely clasp matches
Organize images before you compare. Group photos by orientation (front, back, open, closed) and by scale (close-up macro, whole bracelet). A single clear close-up of the working edge plus one wider shot showing how the clasp connects to the chain is usually enough to narrow options to 2–3 likely clasp types.
Compare silhouettes first, then fine details. Use a quick checklist: does the clasp present a hollow rectangular mouth (box)? Is there an obvious hinge and claw (lobster)? Is the locking part circular with a small lever (spring ring)? Once you have a silhouette match, inspect hinge pins, notches, and the direction of the tongue’s travel to confirm the subtype.
Cross-check with function clues: look for where pressure is applied to open the clasp, how the parts fold or slide, and whether there is an auxiliary guard. For example, a box clasp with an extra folding plate is a fold-over safety variant; seeing both the box mouth and a separate guard in photos is the most reliable way to reach that conclusion.
Keep an evidence log as you compare: note which photo shows which clue and how confident you are about each observation. When you reach a likely match, list the specific missing confirmations you would need (e.g., clearer photo of the hinge, readable hallmark, or an open-view showing the tongue). That makes any subsequent app-assisted search, jeweler visit, or repair estimate more efficient.
- Step 1 — Collect: close-up open/closed + wider connection shot.
- Step 2 — Silhouette match: box, lobster, spring ring, toggle, etc.
- Step 3 — Inspect moving parts: hinge, tongue, notch, latch.
- Step 4 — Look for secondary security: fold-over, figure-eight, safety chain.
- Step 5 — Record uncertainties and required follow-up photos or tests.
- Step 6 — Compare similar models and note distinguishing micro-clues (pivot pin, slot depth, spring housing).
App workflow
After you’ve gathered clear, diagnostic photos and completed the checklist, use an app like Jewelry Identifier as a first-pass comparison tool to broaden or validate your shortlist. Upload or scan photos from your phone within the app (use the app’s camera or import camera-roll images) and tag the clasp area so the comparison focuses on the working parts, not decorative details.
Treat app results as research notes rather than final proof. A well-trained app can match silhouettes and common construction details and suggest likely clasp types or close lookalikes, but it cannot confirm metal purity, maker authenticity, or internal spring condition from a single image. Use the app’s suggestions to prioritize further checks such as a jeweler’s inspection or a tests for metal content when those questions matter.
Use the app to organize and refine your evidence. Save the photos that clearly show hinge, tongue, or latch and attach short notes: which features convinced you of a match, what’s still unclear, and what next photos would resolve the uncertainty. That documentation speeds any subsequent professional assessment and reduces back-and-forth if you consult an app-assisted community or a local jeweler.
If the app returns multiple close matches, revisit the comparison workflow and target the precise missing detail that separates the top candidates: an open-view showing a tongue direction, a microphoto of the notch depth, or a shot revealing whether a secondary safety is present. Then run the updated images back through the app to see how confidence shifts with better evidence.
- Use the app camera or import focused photos from your phone.
- Tag the clasp area so comparisons focus on working parts.
- Treat results as notes — not conclusive verification.
- Save images and short evidence notes to speed professional checks.
- If results conflict, take targeted follow-up photos (open view, hinge close-up).
- Use app suggestions to prioritize in-person inspection or tests.
Related guides
Use Jewelry Identifier after your visual checklist
Once you’ve photographed the clasp open and closed and noted the strongest clues, use Jewelry Identifier on your phone for a first-pass comparison. Tag the clasp area, save the images that show moving parts, and treat results as research notes — helpful leads, not final proof. If the app’s suggestions leave any doubt about metal, maker, or safety, bring your documentation to a trusted jeweler or appraisal service for hands-on testing and verification. Start with clear close-ups and an open-view of the working edge to get the most useful app matches.
Take the next step →Frequently asked questions
How can I tell a box clasp from a safety (fold-over) clasp in a photo?
A box clasp shows a rectangular or square hollow with a tongue that slides into it; in photos you’ll see the box mouth and often a seam where the tongue inserts. A fold-over safety adds a secondary plate or small hinged guard that flips over the box mouth — the guard is usually visible as a separate piece sitting on top of the box. If the guard is visible even slightly offset from the box, that’s strong evidence of a safety variant. If either element is obscured, ask for a photo of the clasp open and from the side where the guard would fold.
Can a photo tell me if a clasp is about to fail or is unsafe to wear?
Photos can reveal obvious structural damage such as a cracked hinge, a bent tongue, or a torn end link — visual signs that a clasp may be unreliable. Warning signs to photograph include gaps where parts should meet, excessive visible wear at pivot points, or a loose-looking spring housing. However, internal spring fatigue and microscopic corrosion are not visible in most photos, so any concerning wear you see should prompt a hands-on check by a jeweler before continued use.
Will a picture show whether a clasp is made of solid gold or plated metal?
No — color and surface clues alone cannot reliably distinguish plated from solid gold. Hallmarks can sometimes indicate metal type if they are clear and legible in the photo, but blurred or partial marks are not proof. For metal confirmation you need readable stamps, acid or electronic tests, or a professional assay. Use photos to find and document potential hallmarks and then pursue physical testing if metal type matters.
What should I do if a photo gives conflicting clues about the clasp type?
When clues conflict — for example, a silhouette that looks like a box clasp but a visible hinge that suggests a lobster — collect specific follow-up images: an open-view showing the tongue or claw, a side profile to reveal hinge orientation, and a macro shot of any notches or engagement teeth. Document which feature led you to each hypothesis and use a comparison workflow or an app to shortlist likely matches, then arrange a hands-on inspection if the clasp’s identity affects repair, resale, or safety.